```text
██████╗ ██████╗ ██████╗ ███╗ ██╗███████╗
██╔════╝ ██╔═══██╗██╔══██╗████╗ ██║██╔════╝
██║ ███╗██║ ██║██║ ██║██╔██╗ ██║███████╗
██║ ██║██║ ██║██║ ██║██║╚██╗██║╚════██║
╚██████╔╝╚██████╔╝██████╔╝██║ ╚████║███████║
╚═════╝ ╚═════╝ ╚═════╝ ╚═╝ ╚═══╝╚══════╝
```
[![Apache licensed][9]][10] [![Docker][3]][4] [![Go Report Card][11]][12] [![Cover.Run][15]][16] [![GoDoc][13]][14]
[3]: https://images.microbadger.com/badges/image/timothyye/godns.svg
[4]: https://microbadger.com/images/timothyye/godns
[9]: https://img.shields.io/badge/license-Apache-blue.svg
[10]: LICENSE
[11]: https://goreportcard.com/badge/github.com/timothyye/godns
[12]: https://goreportcard.com/report/github.com/timothyye/godns
[13]: https://godoc.org/github.com/TimothyYe/godns?status.svg
[14]: https://godoc.org/github.com/TimothyYe/godns
[15]: https://img.shields.io/badge/cover.run-88.2%25-green.svg
[16]: https://cover.run/go/github.com/timothyye/godns
[GoDNS](https://github.com/TimothyYe/godns) is a dynamic DNS (DDNS) client tool. It is a rewrite in [Go](https://golang.org) of my early [DynDNS](https://github.com/TimothyYe/DynDNS) open source project.
---
- [Supported DNS Providers](#supported-dns-providers)
- [Supported Platforms](#supported-platforms)
- [Pre-conditions](#pre-conditions)
- [Installation](#installation)
- [Usage](#usage)
- [Configuration](#configuration)
- [Overview](#overview)
- [Configuration properties](#configuration-properties)
- [Configuration examples](#configuration-examples)
- [Cloudflare](#cloudflare)
- [DNSPod](#dnspod)
- [Dreamhost](#dreamhost)
- [Google Domains](#google-domains)
- [AliDNS](#alidns)
- [DuckDNS](#duckdns)
- [No-IP](#no-ip)
- [HE.net](#henet)
- [Notifications](#notifications)
- [Email](#email)
- [Telegram](#telegram)
- [Slack](#slack)
- [Miscellaneous topics](#miscellaneous-topics)
- [IPv6 support](#ipv6-support)
- [Network interface IP address](#network-interface-ip-address)
- [SOCKS5 proxy support](#socks5-proxy-support)
- [Running GoDNS](#running-godns)
- [As a manual daemon](#as-a-manual-daemon)
- [As a managed daemon (with upstart)](#as-a-managed-daemon-with-upstart)
- [As a managed daemon (with systemd)](#as-a-managed-daemon-with-systemd)
- [As a Docker container](#as-a-docker-container)
- [As a Windows service](#as-a-windows-service)
- [Special Thanks](#special-thanks)
---
## Supported DNS Providers
| Provider | IPv4 support | IPv6 support |
| ------------------------------------- | :----------------: | :----------------: |
| [Cloudflare][cloudflare] | :white_check_mark: | :white_check_mark: |
| [Google Domains][google.domains] | :white_check_mark: | :white_check_mark: |
| [DNSPod][dnspod] | :white_check_mark: | :white_check_mark: |
| [HE.net (Hurricane Electric)][he.net] | :white_check_mark: | :white_check_mark: |
| [AliDNS][alidns] | :white_check_mark: | :x: |
| [DuckDNS][duckdns] | :white_check_mark: | :white_check_mark: |
| [Dreamhost][dreamhost] | :white_check_mark: | :white_check_mark: |
| [No-IP][no-ip] | :white_check_mark: | :white_check_mark: |
[cloudflare]: https://cloudflare.com
[google.domains]: https://domains.google
[dnspod]: https://www.dnspod.cn
[he.net]: https://dns.he.net
[alidns]: https://help.aliyun.com/product/29697.html
[duckdns]: https://www.duckdns.org
[dreamhost]: https://www.dreamhost.com
[no-ip]: https://www.noip.com
## Supported Platforms
* Linux
* MacOS
* ARM Linux (Raspberry Pi, etc.)
* Windows
* MIPS32 platform
To compile binaries for MIPS (mips or mipsle), run:
```bash
GOOS=linux GOARCH=mips/mipsle GOMIPS=softfloat go build -a
```
The binary can run on routers as well.
## Pre-conditions
To use GoDNS, it is assumed:
* You registered (now own) a domain
* Domain was delegated to a supported [DNS provider](#supported-dns-providers) (i.e. it has nameserver `NS` records pointing at a supported provider)
Alternatively, you can sign in to [DuckDNS](https://www.duckdns.org) (with a social account) and get a subdomain on the duckdns.org domain for free.
## Installation
Build GoDNS by running (from the root of the repository):
```bash
cd cmd/godns # go to the GoDNS directory
go get -v # get dependencies
go build # build
```
You can also download a compiled binary from the [releases](https://github.com/TimothyYe/godns/releases).
## Usage
Print usage/help by running:
```bash
$ ./godns -h
Usage of ./godns:
-c string
Specify a config file (default "./config.json")
-h Show help
```
## Configuration
### Overview
* Make a copy of [config_sample.json](./config_sample.json) and name it `config.json`
* Configure your provider, domain/subdomain info, credentials, etc.
* Configure a notification medium (e.g. SMTP to receive emails) to get notified when your IP address changes
* Place the file in the same directory of GoDNS or use the `-c=path/to/your/file.json` option
### Configuration properties
* `provider` — One of the [supported provider to use](#supported-dns-providers): `Cloudflare`, `Google`, `DNSPod`, `AliDNS`, `HE`, `DuckDNS` or `Dreamhost`.
* `email` — Email or account name of the DNS provider.
* `password` — Password of the DNS provider.
* `login_token` — API token of the DNS provider.
* `domains` — Domains list, with your sub domains.
* `ip_url` — A URL for fetching one's public IPv4 address.
* `ipv6_url` — A URL for fetching one's public IPv6 address.
* `ip_type` — Switch deciding if IPv4 or IPv6 should be used (when [supported](#supported-dns-providers)). Available values: `IPv4` or `IPv6`.
* `interval` — How often (in seconds) the public IP should be updated.
* `socks5_proxy` — Socks5 proxy server.
* `resolver` — Address of a public DNS server to use. For instance to use [Google's public DNS](https://developers.google.com/speed/public-dns/docs/using), you can set `8.8.8.8` when using GoDNS in IPv4 mode or `2001:4860:4860::8888` in IPv6 mode.
### Configuration examples
#### Cloudflare
For Cloudflare, you need to provide the email & Global API Key as password (or to use the API token) and config all the domains & subdomains.
Using email & Global API Key
```json
{
"provider": "Cloudflare",
"email": "you@example.com",
"password": "Global API Key",
"domains": [{
"domain_name": "example.com",
"sub_domains": ["www","test"]
},{
"domain_name": "example2.com",
"sub_domains": ["www","test"]
}
],
"resolver": "8.8.8.8",
"ip_url": "https://myip.biturl.top",
"interval": 300,
"socks5_proxy": ""
}
```
Using the API Token
```json
{
"provider": "Cloudflare",
"login_token": "API Token",
"domains": [{
"domain_name": "example.com",
"sub_domains": ["www","test"]
},{
"domain_name": "example2.com",
"sub_domains": ["www","test"]
}
],
"resolver": "8.8.8.8",
"ip_url": "https://myip.biturl.top",
"interval": 300,
"socks5_proxy": ""
}
```
#### DNSPod
For DNSPod, you need to provide your API Token(you can create it [here](https://www.dnspod.cn/console/user/security)), and config all the domains & subdomains.
Example
```json
{
"provider": "DNSPod",
"login_token": "your_id,your_token",
"domains": [{
"domain_name": "example.com",
"sub_domains": ["www","test"]
},{
"domain_name": "example2.com",
"sub_domains": ["www","test"]
}
],
"resolver": "8.8.8.8",
"ip_url": "https://myip.biturl.top",
"ip_type": "IPV4",
"interval": 300,
"socks5_proxy": ""
}
```
#### Dreamhost
For Dreamhost, you need to provide your API Token(you can create it [here](https://panel.dreamhost.com/?tree=home.api)), and config all the domains & subdomains.
Example
```json
{
"provider": "Dreamhost",
"login_token": "your_api_key",
"domains": [{
"domain_name": "example.com",
"sub_domains": ["www","test"]
},{
"domain_name": "example2.com",
"sub_domains": ["www","test"]
}
],
"resolver": "8.8.8.8",
"ip_url": "https://myip.biturl.top",
"ip_type": "IPV4",
"interval": 300,
"resolver": "ns1.dreamhost.com",
"socks5_proxy": ""
}
```
#### Google Domains
For Google Domains, you need to provide email & password, and config all the domains & subdomains.
Example
```json
{
"provider": "Google",
"email": "Your_Username",
"password": "Your_Password",
"domains": [{
"domain_name": "example.com",
"sub_domains": ["www","test"]
},{
"domain_name": "example2.com",
"sub_domains": ["www","test"]
}
],
"resolver": "8.8.8.8",
"ip_url": "https://myip.biturl.top",
"interval": 300,
"socks5_proxy": ""
}
```
#### AliDNS
For AliDNS, you need to provide `AccessKeyID` & `AccessKeySecret` as `email` & `password`, and config all the domains & subdomains.
Example
```json
{
"provider": "AliDNS",
"email": "AccessKeyID",
"password": "AccessKeySecret",
"login_token": "",
"domains": [{
"domain_name": "example.com",
"sub_domains": ["www","test"]
},{
"domain_name": "example2.com",
"sub_domains": ["www","test"]
}
],
"resolver": "8.8.8.8",
"ip_url": "https://myip.biturl.top",
"interval": 300,
"socks5_proxy": ""
}
```
#### DuckDNS
For DuckDNS, only need to provide the `token`, config 1 default domain & subdomains.
Example
```json
{
"provider": "DuckDNS",
"password": "",
"login_token": "3aaaaaaaa-f411-4198-a5dc-8381cac61b87",
"domains": [
{
"domain_name": "www.duckdns.org",
"sub_domains": [
"myname"
]
}
],
"resolver": "8.8.8.8",
"ip_url": "https://myip.biturl.top",
"interval": 300,
"socks5_proxy": ""
}
```
#### No-IP
Example
```json
{
"provider": "NoIP",
"email": "mail@example.com",
"password": "YourPassword",
"domains": [
{
"domain_name": "ddns.net",
"sub_domains": ["timothyye6"]
}
],
"ip_type": "IPv4",
"ip_url": "https://myip.biturl.top",
"resolver": "8.8.8.8",
"interval": 300,
"socks5_proxy": ""
}
```
#### HE.net
For HE, email is not needed, just fill DDNS key to password, and config all the domains & subdomains.
Example
```json
{
"provider": "HE",
"password": "YourPassword",
"login_token": "",
"domains": [{
"domain_name": "example.com",
"sub_domains": ["www","test"]
},{
"domain_name": "example2.com",
"sub_domains": ["www","test"]
}
],
"resolver": "8.8.8.8",
"ip_url": "https://myip.biturl.top",
"interval": 300,
"socks5_proxy": ""
}
```
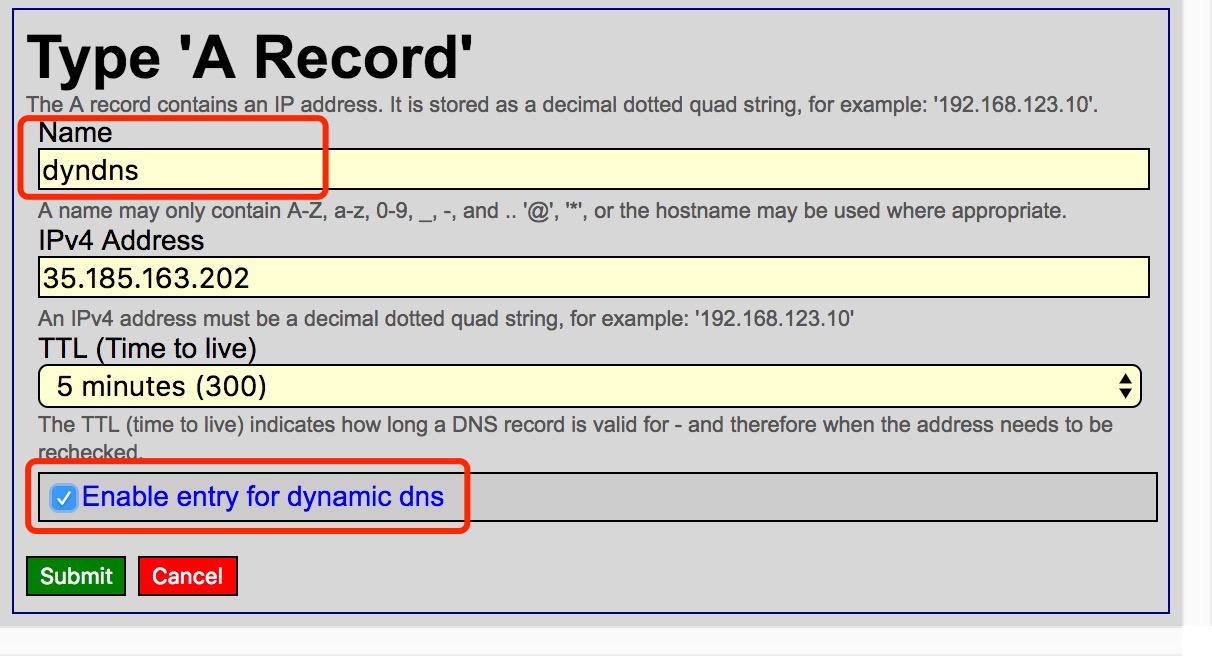
Provider configuration
Add a new "A record" and make sure that "Enable entry for dynamic dns" is checked:
 Fill in your own DDNS key or generate a random DDNS key for this new created "A record":
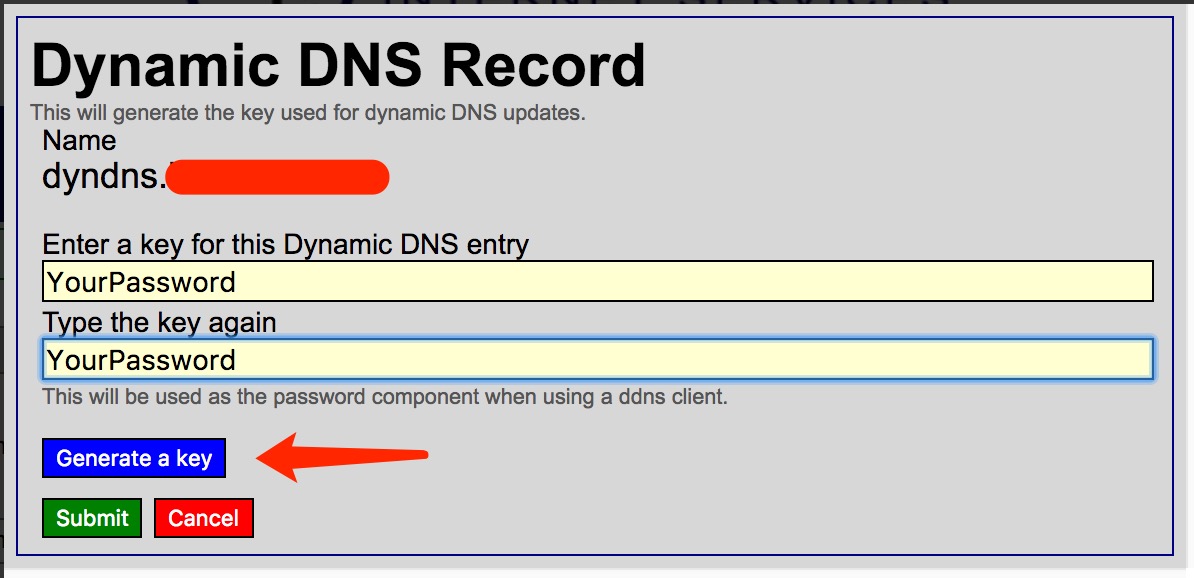 Remember the DDNS key and set it in the `password` property in the configuration file.
__NOTICE__: If you have multiple domains or subdomains, make sure their DDNS key are the same.
Remember the DDNS key and set it in the `password` property in the configuration file.
__NOTICE__: If you have multiple domains or subdomains, make sure their DDNS key are the same.
### Notifications
GoDNS can send a notification each time the IP changes.
#### Email
Emails are sent over [SMTP](https://en.wikipedia.org/wiki/Simple_Mail_Transfer_Protocol). Update your configuration with the following snippet:
```json
"notify": {
"mail": {
"enabled": true,
"smtp_server": "smtp.example.com",
"smtp_username": "user",
"smtp_password": "password",
"smtp_port": 25,
"send_to": "my_mail@example.com"
}
}
```
Each time the IP changes, you will receive an email like that:
 #### Telegram
To receive a [Telegram](https://telegram.org/) message each time the IP changes, update your configuration with the following snippet:
```json
"notify": {
"telegram": {
"enabled": true,
"bot_api_key": "11111:aaaa-bbbb",
"chat_id": "-123456",
"message_template": "Domain *{{ .Domain }}* is updated to %0A{{ .CurrentIP }}",
"use_proxy": false
},
}
```
The `message_template` property supports [markdown](https://www.markdownguide.org). New lines needs to be escaped with `%0A`.
#### Slack
To receive a [Slack](https://slack.com) message each time the IP changes, update your configuration with the following snippet:
```json
"notify": {
"slack": {
"enabled": true,
"bot_api_token": "xoxb-xxx",
"channel": "your_channel",
"message_template": "Domain *{{ .Domain }}* is updated to \n{{ .CurrentIP }}",
"use_proxy": false
},
}
```
The `message_template` property supports [markdown](https://www.markdownguide.org). New lines needs to be escaped with `\n`.
### Miscellaneous topics
#### IPv6 support
Most of the [providers](#supported-dns-providers) support IPv6.
To enable the `IPv6` support of GoDNS, there are two solutions to choose from:
1. Use an online service to lookup the external IPv6
For that:
- Set the `ip_type` as `IPv6`, and make sure the `ipv6_url` is configured
- Create an `AAAA` record instead of an `A` record in your DNS provider
#### Telegram
To receive a [Telegram](https://telegram.org/) message each time the IP changes, update your configuration with the following snippet:
```json
"notify": {
"telegram": {
"enabled": true,
"bot_api_key": "11111:aaaa-bbbb",
"chat_id": "-123456",
"message_template": "Domain *{{ .Domain }}* is updated to %0A{{ .CurrentIP }}",
"use_proxy": false
},
}
```
The `message_template` property supports [markdown](https://www.markdownguide.org). New lines needs to be escaped with `%0A`.
#### Slack
To receive a [Slack](https://slack.com) message each time the IP changes, update your configuration with the following snippet:
```json
"notify": {
"slack": {
"enabled": true,
"bot_api_token": "xoxb-xxx",
"channel": "your_channel",
"message_template": "Domain *{{ .Domain }}* is updated to \n{{ .CurrentIP }}",
"use_proxy": false
},
}
```
The `message_template` property supports [markdown](https://www.markdownguide.org). New lines needs to be escaped with `\n`.
### Miscellaneous topics
#### IPv6 support
Most of the [providers](#supported-dns-providers) support IPv6.
To enable the `IPv6` support of GoDNS, there are two solutions to choose from:
1. Use an online service to lookup the external IPv6
For that:
- Set the `ip_type` as `IPv6`, and make sure the `ipv6_url` is configured
- Create an `AAAA` record instead of an `A` record in your DNS provider
Configuration example
```json
{
"domains": [
{
"domain_name": "example.com",
"sub_domains": [
"ipv6"
]
}
],
"resolver": "2001:4860:4860::8888",
"ipv6_url": "https://api-ipv6.ip.sb/ip",
"ip_type": "IPv6"
}
```
2. Let GoDNS find the IPv6 of the network interface of the machine it is running on (more on that [later](#network-interface-ip-address)).
For this to happen, just leave `ip_url` and `ipv6_url` empty.
Note that the network interface must be configured with an IPv6 for this to work.
#### Network interface IP address
For some reasons if you want to get the IP address associated to a network interface (instead of performing an online lookup), you can specify it in the configuration file this way:
```json
...
"ip_url": "",
"ip_interface": "interface-name",
...
```
With `interface-name` replaced by the name of the network interface, e.g. `eth0` on Linux or `Local Area Connection` on Windows.
Note: If `ip_url` is also specified, it will be used to perform an online lookup first and the network interface IP will be used as a fallback in case of failure.
#### SOCKS5 proxy support
You can make all remote calls go through a [SOCKS5 proxy](https://en.wikipedia.org/wiki/SOCKS#SOCKS5) by specifying it in the configuration file this way:
```json
...
"socks5_proxy": "127.0.0.1:7070"
"use_proxy": true
...
```
## Running GoDNS
There are few ways to run GoDNS.
### As a manual daemon
```bash
nohup ./godns &
```
Note: when the program stops, it will not be restarted.
### As a managed daemon (with upstart)
1. Install `upstart` first (if not available already)
2. Copy `./upstart/godns.conf` to `/etc/init` (and tweak it to your needs)
3. Start the service:
```bash
sudo start godns
```
### As a managed daemon (with systemd)
1. Install `systemd` first (it not available already)
2. Copy `./systemd/godns.service` to `/lib/systemd/system` (and tweak it to your needs)
3. Start the service:
```bash
sudo systemctl enable godns
sudo systemctl start godns
```
### As a Docker container
With `/path/to/config.json` your local configuration file, run:
```bash
docker run \
-d --name godns --restart=always \
-v /path/to/config.json:/usr/local/godns/config.json \
timothyye/godns:latest
```
### As a Windows service
1. Download the latest version of [NSSM](https://nssm.cc/download)
2. In an administrative prompt, from the folder where NSSM was downloaded, e.g. `C:\Downloads\nssm\` **win64**, run:
```
nssm install YOURSERVICENAME
```
3. Follow the interface to configure the service. In the "Application" tab just indicate where the `godns.exe` file is. Optionally you can also define a description on the "Details" tab and define a log file on the "I/O" tab. Finish by clicking on the "Install service" button.
4. The service will now start along Windows.
Note: you can uninstall the service by running:
```
nssm remove YOURSERVICENAME
```
## Special Thanks
 Thanks JetBrains for sponsoring this project with [free open source license](https://www.jetbrains.com/community/opensource/).
> I like GoLand, it is an amazing and productive tool.
Thanks JetBrains for sponsoring this project with [free open source license](https://www.jetbrains.com/community/opensource/).
> I like GoLand, it is an amazing and productive tool.